Within Photoshop, there is a wide range of blur filters at your disposal, each capable of producing intriguing effects. One such filter that stands out is Radial Blur, renowned for its ability to generate a captivating focal point. Join me as we explore this powerful tool and uncover its creative potential.
1. What is Radial Blur in Photoshop?
The radial blur effect, also known as the radial blur technique, involves capturing the illusion of rapid circular or radial movements. Photographers achieve this effect by utilizing a slow shutter speed while swiftly panning or zooming. Mastering this technique can be quite challenging due to its intricacies and technical demands.
In contrast, Photoshop offers a unique advantage. By employing a few straightforward edits, you can effortlessly simulate the captivating radial blur effect. This feature allows you to enhance your photographs, imbuing them with a dynamic sense of speed and leaving a lasting impression on viewers.
2. How to Use Radial Blur in Photoshop
Let's embark on our journey of utilizing the Radial Blur filter in Photoshop to craft a captivating focus effect for your image. Begin by opening the desired photo in Photoshop, selecting the subject that you wish to emphasize and draw strong attention to.
Step 1: Create clone layer .
The image you open will appear under the background layer, which cannot be edited. You need to create a duplicate layer before working.
Right click on the background layer and choose Duplicate Layer...
Once the Background Copy Layer is created, make sure you click on it .
Step 2: Select the subject with the Quick Selection Tool .
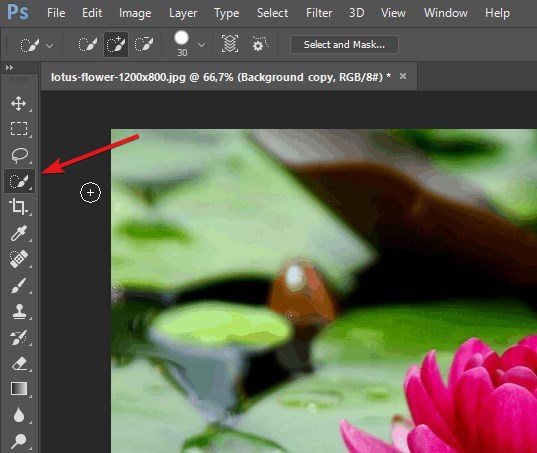
You need to isolate the object so that it is always clear, not blurred by the Radial Blur filter. Do that using the Quick Selection Tool on the left toolbar.
Use the Quick Selection Tool with the plus sign to select your object. Select multiple times until the object has the following outline:
The Quick Selection Tool minus will help you remove redundant selections.
Once the object has been relatively accurately selected, you press Ctrl + J (or Command + J) . Photoshop will turn this selection into a new layer.
Step 3: Add Radial Blur .
To add a radial blur effect, you need to first make sure to select the “ Background Copy ” layer.
Next, go to Filter >> Blur >> Radial Blur .
The Radial Blur panel will appear, this is where you make adjustments.
- Amout: Blur level - adjust based on your taste
- Blur Method: Zoom
- Quality: Good
You can preview your adjustments with the white square in the Blur Center section .
Next, you need to adjust the center point (Blur Center) to the position of your subject on the image. In my case the object was near the bottom right corner.
Click OK and your settings will be applied. If the results are not satisfactory, you can return to the Radial Blur window and adjust again.
Step 4: Modify the object accordingly .
You can see that the object is still clearly separated from the Radial Blur effect. Let's make the contact area smoother.
Select Layer 1 >> Add layer mask .
Select the Brush Tool (B) on the toolbar, set the brush to black , Opacity and Flow are both 100% .
Now, slowly draw around the edges of the object that you don't want to focus on.
Conclude
As a result, we've successfully created an awe-inspiring image using the Radial Blur technique. Don't hesitate to apply this captivating effect to numerous other images, allowing your creativity to flourish. Best of luck on your artistic endeavors!


